I am a cake baker and decorator based in Wilmslow, Cheshire. I enjoy what I do and strive to make quality cakes with the best designs possible. I make custom made cakes for any and all occasions, call me at 07817444384 for your cake needs. Please check out my new website too: www.cake-jeanie.co.uk
Sunday, 31 May 2015
17 And Mad About Marvel
My eldest is 17!! How did that happen??
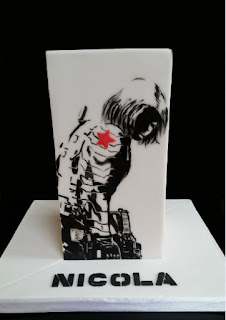
Nicola (the one turning 17 and pictured above cutting her cake, with little sis looking on) asked for a Captain America, Winter Soldier themed cake, with emphasis on Winter Soldier. She asked for vanilla cake with chocolate orange ganache. We've been a bit mad about chocolate orange ganache ever since we tried it a few months ago. We tried both chocolate ganache with fresh orange rind, and ganache made with Terry's chocolate orange. The ganache with the fresh orange rind won hands down!
We both started browsing the images of the comics for inspiration, and originally I was going to have both Captain America and the Winter Soldier on the cake, but in the end an image of the Winter Soldier captured both our imaginations. It's in black and white (and a tiny bit of red):
Because of the image, instead of a round cake, I decided to go for a rectangular cake. I printed the image off, put tracing paper over it and traced the image, then when the cake was covered in sugarpaste and ready, I placed the image pencil side onto the cake and traced over the image with a pencil. The image, as you can see, is very detailed, so I did leave out quite a few details. Also the cake wasn't wide enough so most of the soldier's backside isn't seen on the cake. More's the pity.
Painting the image was a painstaking task. The pencil outline wasn't that clear. I used a black food pen to try and get more of an outline, using the printed image as a guide.Then with a small brush and a mixture of black dust and confectioner's glaze as paint, I painted the shadows on bit by little bit.
I asked Nicola if she'd like a quote from the movie included on the cake as well, and she immediately said 'Who the Hell is Bucky?' (the Winter Soldier IS Bucky).
Lastly, I made Nicola's name and age with black gumpaste. I downloaded the Captain America font, typed Nicola's name and age in word using this font, printed it out then cut out the individual letters and numbers. I rolled the gumpaste to the required thickness and let it set for about 20mins. After the gumpaste set, I put trex on the gumpaste so that the letters would stay in place, placed the letters on top and cut out with a craft knife. This is never an easy task especially when curves are involved, but I managed!
Happy birthday to a wonderful daughter... I love ya x
A Cake For Nan
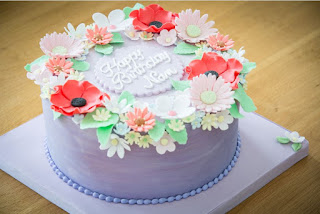
I had the privilege of meeting Martin Pawlett of Martin Pawlett Photography. We met through Cheshire Ladders' Pay It Forward game, where we swapped skills with other small businesses. Martin offered photography, so I offered cake! Here are some photos taken by Martin himself, and with my own phone camera with Martin's help :) It was his Nan's birthday so he asked for a victoria sponge cake for her.
His only brief was to use light purple, and the rest was left to me, so this flower design was what I came up with. Some flowers are 'real'- gerberas, daisies and so on, while others are 'fantasy'. I piped royal icing dots on some of the flowers to give a bit more visual interest and texture.
I had painted the sides of the cake with a purple shimmer, but it needed a lot more coating of the shimmer and so it didn't shine as much. I was also working with what I had- vodka - which made it quite difficult to paint on. I will need to buy some rose water for any shimmer work next time!
I will feature more of Martin's photos of my other cakes soon :)
Monday, 30 March 2015
Coronation Street Cake
I got an email about a cake that had a Coronation Street theme. In the end, the design that was finalised was a rectangular shaped cake that doubled as the brick wall with the 'Coronation St' sign on the side of it, a figure of the birthday girl sitting on top of the cake.
I started with the figure first. It was a bit last minute so I had to make sure I made the figure so it dried in good time. The brief for the clothing was- converse trainers, jeans, poncho and hat. I had a picture to work with and included a bit of make up on the face- red lipstick, a bit of blusher and mascara!
The brick wall was great fun to make too- I had a fantastic time making the white sugarpaste come to life as a brick wall. I made the 'bricks' first with a ruler and cake tool (dresden tool I think it's called). Then I airbrushed the top of wall first and mixed yellow, peach and a bit of brown to get the stone effect. I airbrushed the bricks with a yellow first, then orange, then red, and finally some dark purple to get the multi coloured effect that I love on some kinds of bricks. I also airbrushed a bit of green on the bottom part of the wall to simulate algae that we often get in this very English climate. I finished the wall with some flowers, and added the name of the birthday girl to the board.
I got a very lovely reaction from my customer 'better than I thought it would be' or something to that effect (sorry, Callum, can't remember what you said exactly!!!).
On to the next cake!! Have a great day folks :)
Monday, 23 March 2015
Postman Pat and His Black and White Cat
Time to play spot the mistake!! To play, read on...
This Postman Pat cake was created for a little boy who turned 5 at the weekend. Postman Pat, Jess (the cat), the Royal Mail truck and postbox are all handmade. The sky was spray painted blue,, and the background was handpainted using edible gel colours.
So... have a good look at the pictures and see if you can spot the rather glaring mistake I made :)
Sunday, 1 March 2015
Queen Elsa Cakes
Frozen madness still lives on! These cakes were made for a little girl who turned 6 and loves the movie Frozen and of course, its characters- Queen Elsa, Princess Anna and Olaf. The dress of Queen Elsa is all cake- vanilla sponge with French vanilla and chocolate buttercream in alternating layers. It's not showing on the photos, but a lot of glitter was used!
Wednesday, 28 January 2015
Tulip Painting
I made this birthday cake for a lady who loves tulips. It is an extra tall cake measuring 7.5" high, 6" in diameter. The bottom layers are Victoria sponge, the top layers are chocolate cake, all filled and iced with French buttercream, which is lush.
I was a bit worried about delivering the cake as it was so tall I thought it might topple over. It was fine, though. I needn't have worried. The cake was securely fixed to the cake drum with melted chocolate!
Onto the next project!
Saturday, 24 January 2015
Ghostbusters: Giant Marshmallow Man
Lots of people asked me if this was a toy or a cake. It is cake for sure. The last two photos show the cake when it was in progress! It is vanilla cake with vanilla buttercream. The underside of the 'torso' is styrofoam. The head is made of rice krispie treats and everything else is gumpaste/sugarpaste. It is my first 3d cake of a standing figure, so I'm really happy that one, I've made it, and two, it stayed standing! The cake box acted as background too and really set the cake off.
There was a lot of work that went into the cake. The armature (support) took a while and next time I will use threaded metal poles for added stability. Covering the cake in sugarpaste took two tries as the sugarpaste wasn't strong enough so I used the panelling method which worked better.
I do love this cake!
Subscribe to:
Posts (Atom)


