I am a cake baker and decorator based in Wilmslow, Cheshire. I enjoy what I do and strive to make quality cakes with the best designs possible. I make custom made cakes for any and all occasions, call me at 07817444384 for your cake needs. Please check out my new website too: www.cake-jeanie.co.uk
Sunday, 31 May 2015
17 And Mad About Marvel
My eldest is 17!! How did that happen??
Nicola (the one turning 17 and pictured above cutting her cake, with little sis looking on) asked for a Captain America, Winter Soldier themed cake, with emphasis on Winter Soldier. She asked for vanilla cake with chocolate orange ganache. We've been a bit mad about chocolate orange ganache ever since we tried it a few months ago. We tried both chocolate ganache with fresh orange rind, and ganache made with Terry's chocolate orange. The ganache with the fresh orange rind won hands down!
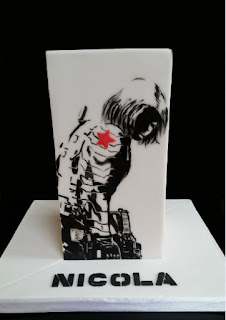
We both started browsing the images of the comics for inspiration, and originally I was going to have both Captain America and the Winter Soldier on the cake, but in the end an image of the Winter Soldier captured both our imaginations. It's in black and white (and a tiny bit of red):
Because of the image, instead of a round cake, I decided to go for a rectangular cake. I printed the image off, put tracing paper over it and traced the image, then when the cake was covered in sugarpaste and ready, I placed the image pencil side onto the cake and traced over the image with a pencil. The image, as you can see, is very detailed, so I did leave out quite a few details. Also the cake wasn't wide enough so most of the soldier's backside isn't seen on the cake. More's the pity.
Painting the image was a painstaking task. The pencil outline wasn't that clear. I used a black food pen to try and get more of an outline, using the printed image as a guide.Then with a small brush and a mixture of black dust and confectioner's glaze as paint, I painted the shadows on bit by little bit.
I asked Nicola if she'd like a quote from the movie included on the cake as well, and she immediately said 'Who the Hell is Bucky?' (the Winter Soldier IS Bucky).
Lastly, I made Nicola's name and age with black gumpaste. I downloaded the Captain America font, typed Nicola's name and age in word using this font, printed it out then cut out the individual letters and numbers. I rolled the gumpaste to the required thickness and let it set for about 20mins. After the gumpaste set, I put trex on the gumpaste so that the letters would stay in place, placed the letters on top and cut out with a craft knife. This is never an easy task especially when curves are involved, but I managed!
Happy birthday to a wonderful daughter... I love ya x


